Lavender Love

Lavender Heart

I love lavender: the plant, the flower, the scent, the memories it evokes.  I love rubbing an old-world lavender plant between my hands and inhaling the wonderful floral-citrus aroma of the leaves and flowers.

2013 June 310

What better way to celebrate this love, and keep the scent with me year-round, than to make a heart out of flowering lavender stems. I can’t remember where I got the idea for making lavender hearts, and I don’t pretend to have invented the craft, but I present here the steps I use to create my lavender hearts, with a few tricks I have developed over time to make it easier and more stable.

Supplies

  • 8-12 flowering lavender stems (even number)
  • 5 feet of ribbon (cut into one 4′ and two 6″ lengths)
  • two clothes pins or clips

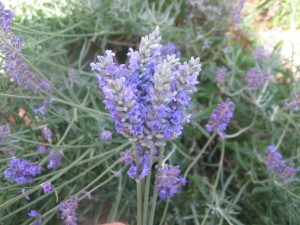
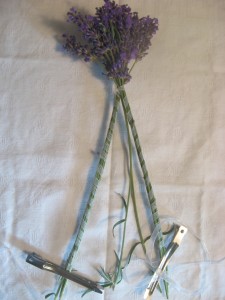
It’s best to pick the flowers before they have opened, and preferably early in the day. Of course I missed my window, so these heads have bloomed, and are therefore bulkier. They still smell lovely, and I’m sure the scent will last. I used 12 stems for this heart.

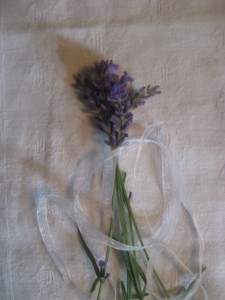
Arrange the stems with the base of the flower heads staggered to create a lovely arrangement and decide what will be the front of the arrangement, or bouquet.

Fold the 4′ strand of ribbon in half and tie it around the base of the flower heads, like so:

Tied Flower Heads

Tie a double-knot, not too tight, and slip the knot to the back of the bouquet.

Separate the stems into three sets, with two in the middle, and an even number on either side, for example if you have eight stems, you would put three on each side and keep two in the middle.

Wrap one strand of ribbon around one set of stems and clip it so it doesn’t come unravelled. Wrap the other strand around the other set of stems and clip it. Leave the two stems in the middle unwrapped.

The arrangement will look like this:

July 040

Using thin pliers, gently crush the base of the two unwrapped stems so that they don’t break when you bend them, and fold them over the back of the bouquet (180 degrees) so that they are pointing in the same direction as the flowers.

Carefully bend each wrapped stem up over the flowers until they cross over in front of the two unwrapped stems. Grab all three sets of stems like this (view from the back):

2013 July 043

Here’s where those two middle stems come in. Pull the two middle (unwrapped) stems up or down to create as much curve in the heart as you would like. In previous years, when I didn’t have the middle stems, the heart had a tendency to twist out of shape, and it tended to be long and thin. With the addition of the two middle stems, my hearts are fuller and more stable.

Now, using one six-inch strand of ribbon, tie it around the base of the heart, at the intersection of the three sets of stems. In the photo above, this would be the point just above my index finger. Tie a double-knot, but not too tight or the stems will twist. Trim off the ends of the 6″ ribbon so you can’t see them.

Unclip the ribbons from the wrapped stems (the double-knotted 6″ ribbon will keep them from unravelling) and unwrap them up to the tied part. Wrap them around the stems, at least once, and bring them to the front of the heart; this part is inexact, do your best, the stems are already secure, you’re just trying to make it pretty at this point. Tie the two ribbons into a bow, then do a double knot so the bow doesn’t come undone. You can still adjust the middle stems to get the shape you want. Place the heart flat on the table and pull the flower heads out and arrange them as desired. Adjust everything until it is juuuust right.

Use scissors to trim the ends of the stems and ribbon.

Take the second piece of six-inch ribbon and loop it around the top so you can hang the heart in a special place. I just placed the ribbon at the back of the heart and threaded one end through each side, then tied an overhand knot

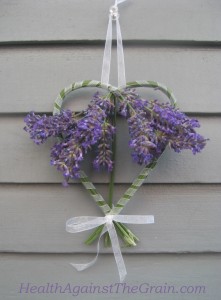
And there you have it. A beautiful lavender heart to share.

Lavender Heart on Door

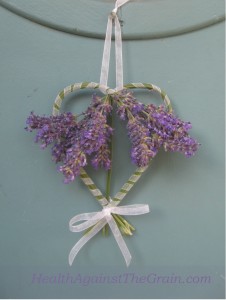
I gave this heart to my neighbour, as a thank you for letting me cut some of the lavender outside her door. She divided her bush one spring and gave me a plant, but with my black thumb, it never did grow, so I’m back to begging her for stems. The photo above is the lavender heart hanging on her door: thank you Hilary.

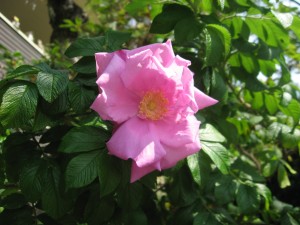
And here is a scented rose from my garden. Just because I love scented plants.

Highly scented roses

I live in Vancouver, where lavender grows abundantly. Last weekend, I made my first heart of the season with wild lavender I picked from an abandoned lot, but the photos didn’t turn out and I didn’t have the right kind of ribbon, so I started again with Hilary’s lavender.

I also love lavender because of its connection to France. My paternal ancestors came from France, and I feel a strong affinity to the country, its history and customs, its food, language, culture. My husband and I visited in 1993, and our hope is to some day bring the kids there. My heart is in France.

Last summer, we didn’t get to France, but we did find an abundance of lavender. In Kelowna, we visited Okanagan Lavender and Herb Farm on our road trip to Calgary for my niece’s wedding. It was a magical experience. I learned a lot about the different varieties and scents of lavender. And I’ve never seen so much lavender in one place. I encourage you to visit if you’re ever in the area.

Let me know if this craft works for you, and post or send me a picture of your lavender hearts. By this time next year, I expect to see a profusion of lavender hearts on Pinterest.

Love, Theresa

Natural (and Not so Natural) Dyed Easter Eggs

Naturally-Dyed Eggs

I love having beautifully decorated Easter eggs on the table at this time of year. Last year, I decided to make a batch with some natural ingredients and local greens. I made dyes with  yellow onion skins and grated red beets (“recipe” below).

I much prefer using natural over synthetic dyes. Here is an interesting article from the Huffington Post about the history and digestion of food colouring and dyes. Even though we don’t always eat our Easter eggs, I just prefer going all natural; I can be a fanatical purist sometimes. And I was for this project, at least initially.

After making the naturally-dyed eggs, I felt a hankering for something more bright, more pink, more Eastery. I had heard about silk dyeing, and looked up Martha Stewart’s instructions. I’m a bit of a science geek, and I just found instructions from Scientific American in the form of a science experiment (cool). Don’t get me wrong, I know this isn’t natural, the dyes aren’t edible, and I would never eat these eggs, but sometimes…I just want something different. That’s me, I never colour inside the lines, square peg and all that.

Silk-Dyed Eggs

I used a couple of threadbare silk shirts I had already cut up into rags (how decadent is that, I’ve got silk rags). I tore up some old cotton sheets, and I was set. I’ve written the silk-dyed instructions below.

The Deception of “Natural Dyes”

Back to the natural colours, there is no shortage of web pages or blog posts with lists and tables of colours and the natural ingredients you can use to achieve them. How wonderful.

Not really. Too many posts with instructions for natural dyes are disingenuously adorned with photos of deep pastel-coloured eggs. We try these recipes and think we’ve done something wrong when our eggs don’t turn out like the ones in the pictures. Or we dip the eggs for 20 minutes and are frustrated when the eggs aren’t dark enough. It takes patience, but it’s frustrating when people keep perpetuating untruths about natural dyes by re-posting recipes they haven’t tried.

You’ll notice for example that despite giving a list of ingredients to make five natural colours, including pink and blue, Martha Stewart only shows a half-dozen rust-coloured (sorry, sienna-coloured) eggs in this article. And the Huffington Post article I mentioned above uses a Flickr photo of artificially-coloured eggs. In reality, most natural dyes will yield variations on earth tones for dyed eggs.

I am on a quest to find a natural dye that produces a true deep red or pink colour. Suggestions I’ve found for red are: cranberries; canned cherries with juice; pomegranate juice; red raspberries; or lots of red onion skins. For pink: beets. I have yet to try these all, and though they might work for icing, they probably don’t work for eggs. Most are not cheap either. But if you’ve found something natural (and sorry, for me beetle shells don’t count) that works to dye an egg deep pink or true red, please share in the comments below and I’ll send good karma your way.

Quick and Dramatic Silk-Dye Method

I didn’t invent this method, but collected the instructions from different articles. Cut a piece of vibrantly-coloured 100% silk into a piece big enough to wrap around your raw white egg, with a nice design centred on the front. You can use men’s ties, silk scarves, blouses. but it must be 100% silk (that’s the natural part), no polyester. Cover with a larger piece of lightweight, white cloth or cheesecloth and tie closed with a twist tie, elastic or piece of string. I used a torn up old bedsheet.

Place cloth-covered raw eggs into a small pot and pour in enough water to cover completely. Add 1/4 cup of white vinegar. Bring to a boil and simmer for 20 minutes. The vinegar reacts with the dyes in the silk to bind with the calcium carbonate in the egg shell.

Remove from pot and let cool for 5-10 minutes before removing the wrappings to discover the magic inside. Here’s what I got.

Silk-Dyed Easter Eggs

The vinegar weakens the bond of the calcium carbonate in the egg shell allowing the dye to penetrate it. This is why most dye recipes have vinegar. But vinegar is an acid that lowers the pH of a liquid. Anthocyanin is a chemical found in many of the foods used to make natural dyes. It changes colour depending on the pH of the liquid it is mixed with: acids turn anthocyanin red, alkalies turn it blue. I’d like to experiment with alkaline solutions to see if they would make brighter blues. Now you know why some hydrangeas are blue and others pink, the pH of the soil determines the colour of the flower. OK, enough science.

Natural-Dyed Eggs

Back to the natural dyes. To create a design on each egg, I went foraging for leaves and flowers around the neighbourhood; I live in the Pacific Northwest, so I can do this in March. But hey, I grew up on the prairies so I can feel the pain of the shortage of greenery at this time of year. You could go to a florist and ask for discarded greenery, or use bits of indoor plants. This photo shows some of my collection, with some cloth-wrapped eggs from the silk-dyed eggs described above.

Eggs & Plants

I draped a piece of greenery around each egg and wrapped it in a piece of nylon stocking (my teenage daughter goes through them like nobody’s business); I could have used cheesecloth. I secured each with a twist tie. This photo was taken after the eggs were dyed.

Wrapped Eggs

I placed the eggs into the hot dye water, allowed it to cool, and kept them there until they reached the desired colour.

Eggs in Onion-skin Dye Bath

You can let them sit anywhere from half an hour to 24 hours. Keep checking the colour to see if it’s good enough. I left these eggs in the onion-skin dye overnight. This is not a quick project. But it helps build patience and shows how something of value is worth the wait.

After Dyeing

Remove the covering and greenery. Rinse with clear water and allow to dry. Don’t rub or some of the dye will come off. When they are completely dry, you can rub on a thin layer of  oil to shine them up, be careful not to scrape the eggs when doing this. I used my bare hands to apply a tiny amount of oil, it felt very sensuous.

Beet Dye Fail

I don’t have before or during photos of the beet-dyed eggs, but trust me, the colour with these eggs ranged from light to dark gray, never even close to the pink I was hoping for, even though the dye bath itself was deep pink. There are three beet-dyed eggs in the collection pictures at the top and bottom of this post. I will continue on with my quest for pink, but I’ll save the beets for borscht.

Natural Dyed Easter Eggs
By: 
Recipe type: Craft
Cuisine: Eggs!
Prep time: 
Cook time: 
Total time: 
Serves: 6
 
Use natural ingredients to dye Easter eggs. Dyeing time is anywhere from ½ hour to 24 hours.
Ingredients
  • For rust colour: yellow onion skins from 2-4 medium onions
  • For gray colour: grated beets (2-4 medium unpeeled beets)
  • 4 cups water for each batch
  • 1 tbsp white vinegar for each batch
  • small pot
  • strainer
  • 6 hard-boiled eggs
  • 6 pieces of greenery or flowers to place on eggs
  • 6 pieces (or toes) of nylon stocking or cheesecloth to cover each egg
  • 6 twist ties or pieces of string to tie them up
Instructions
  1. Place onion skins or beets in a medium saucepan and add water.
  2. Cover pot. Bring to a boil and simmer for about 20 minutes.
  3. While dye is simmering, prepare each egg. Drape with a piece of greenery or flower, cover it with the nylon stocking or cheesecloth and tie with the twist tie or string.
  4. Strain the dye and return the liquid to the pot. Add 1 tbsp white vinegar.
  5. Add the wrapped hard-boiled eggs. Leave in as long as necessary to achieve desired depth of colour, from 20 minutes to 24hours.
  6. When desired colour is achieved, remove covering and greenery. Rinse with cold water and allow to dry.
  7. Eggs can be kept indefinitely if allowed to dry in a well-ventilated area, and turned every few months. If you wish to eat them, do so within a few days.


Here’s the final product, natural-dyed eggs mixed with the silk-dyed ones. Oh, and there’s one crayon-coloured egg my youngest did in school. I’m sure she had much more fun helping me with the home-made ones.

Mixed Easter Eggs

And, I have a little secret. I still have these eggs, one year later. The photo above was taken last year. This morning, I took a photo of the eggs I have left, here’s what they look like.

One year old Easter eggs

Some have faded more than others, but they are still Eastery enough for me. I knew I could leave them to dry in their shells. I have a Polish neighbour who does pysanka, and she said she just leaves the eggs to dry and keeps them from year to year, although I’m not sure if she uses raw or hard-boiled eggs. My eggs did smell after a few weeks, so I left them in the porch for a while, but now they are quite dry and odourless. What I’ve since read advises to leave them in cardboard egg cartons and to rotate them every few months to allow the gases to escape. The dye from the natural eggs comes off if I scrub or scrape them to clean them, even today, but the silk-dyed eggs’ colour is thoroughly embedded in the egg shell and doesn’t rub off.

That’s it. Let me know what you think, share your experiences, and have fun colouring your Easter eggs. Just don’t fool yourself into thinking it’s a quick project with instant, dramatic results…unless you’re doing the silk-dyed eggs.

All photos (c) 2013 healthagainstthegrain.com

Pizza vs. Pizza

Without realizing it, my husband and I raced against each other last night to have separate pizzas ready for dinner. It was Friday afternoon after a long week for me, I had the afternoon off work. At 4:00, he asked “Can I just go to the grocery store and buy a frozen pizza for dinner?” Of course we’re talking gluten-packed, highly processed pizza here. No problem I said. I can always eat eggs; kind of my SCD hunger mantra, if nothing else, I can have eggs.

I can’t force others to eat healthy. My husband doesn’t eat SCD, nor do the kids, but he tries to help me as much as he can. I’ve been reading a blog called Paleo non Paleo and am heartened to read that someone else has the courage to write about living with a spouse who’s not on the same restrictive diet path. Of course, her husband jumped on board after 14 months, but she still writes Paleo non Paleo. Don’t get me wrong, I am grateful for my husband’s support; he cooks dinners most nights, and he does his best to provide me with SCD meals, which I appreciate, it’s just that some days are easier than others to resist non-SCD treats. And as I’ve said, I don’t experience severe consequences for straying, so my penalty for imperfection is transient or nonexistent.

But I just didn’t feel like eggs. Then I remembered reading about a coconut flour pizza crust. I looked it up and decided to make a herbed version right after my husband left for the grocery store. We didn’t realize it yet, but the clock started ticking. I quickly whipped up the ingredients and cooked two medium-size crusts in the frying pan, because it was quicker than baking them. I fried up some sliced mushrooms and caramelized some onions while the crusts cooked.

My husband came home, preheated the oven, and sat down at the kitchen table with a glass of cider. I called my daughter upstairs to help with grating the white cheddar. She asked “Why isn’t Dad making dinner tonight?” He joked “I am making dinner.” Because by this time, his pizza was in the oven.

My crusts were ready, the sauce was made quickly. I put two different toppings on each pizza. My first pizza was ready at the same time as the frozen pizza came out of the oven. It was only when we were sitting down that I realized we had just raced each other: store-bought frozen pizza vs. made-from-scratch-at-the-last-minute pizza. It was a tie for time. But the home-made pizza won for flavour, hands-down!

Coconut-flour crust SCD Pizza

Coconut-flour crust SCD Pizza

Here’s a brief run-down of what I did.

Crust (based on the herbed crust from Free Coconut Recipes)

  • 4 eggs
  • 1 clove garlic, crushed
  • ¼ cup water
  • ½ cup SCD yogurt
  • ½  cup coconut flour, sifted
  • ½  teaspoon baking soda (baking powder isn’t allowed on the SCD)
  • ½  teaspoon salt
  • 1 tsp poultry seasoning
  • ¼  teaspoon dried oregano

Mix wet ingredients together until smooth. Mix dry ingredients together and add to wet ingredients. When working with coconut flour, you need to give it a few minutes to absorb the liquid before cooking. If it’s still too liquid, add more coconut flour until desired consistency.

To cook, use a large frying pan, and either butter, olive oil, or I used pastured lard, to fry half the batter. Fry like a large pancake and flip halfway through until it is cooked. You can try dehydrating it (I did with pizza #2, while I was cooking #1), but it didn’t make much of a difference.

Sauce:

  • ½ cup SCD-legal tomato paste
  • 2 tbsp olive oil
  • 1 tsp poultry seasoning
  • ¼ tsp oregano
  • ½ tsp salt

Mix everything together (too easy, but it works).

Pizza #1 Toppings:

  • ¼ cup pizza sauce
  • mushrooms, sliced fried
  • ¼ onion, sliced & caramelized (fried until brown)
  • sliced kalamata olives (as many as you can afford)
  • thinly sliced green peppers (enough to cover one layer deep)
  • 1 cup grated white cheddar (mozzarella isn’t allowed on the SCD)

Pizza #2 Toppings:

  • ¼ cup pizza sauce
  • ¼ cup white cheddar

Spread sauce on crust and sprinkle with cheddar. Bake 5 minutes at 350F at this point to melt the cheddar, then add:

  • thinly sliced brie cheese (about ¼ cup)
  • ¼ onion, sliced & caramelized (fried until brown)
  • thin layer of grated Parmesan (about 2 tbsp)

To construct the pizza, put the crust on a cookie sheet, add sauce, toppings, and cheese, then bake at 350F long enough for the cheese to melt, about 10-15 minutes.

Hands down, pizza #1 was the favourite. Pizza #2 was actually kind of bland, next time I’ll add some kalamata olives or use Cambozola cheese.

And the crust was pretty good too. It tasted great, and though it had more of a doughy consistency than I would have liked, it was much better than the grainy almond flour crusts I’ve made in the past. It was hearty enough that I could eat it by hand without having it fall apart. Next time, I’ll try a thinner batter, poured over greased parchment paper and baked at 375F, but when I’m tired, that sounds like too much trouble. The thing is, gluten-free or SCD pizza crusts will never have the stretchy, doughy, yeasty flavour of a good home-made gluten dough, but this recipe is the best substitute I’ve found so far. And if I have some extra energy, I might make a batch of them to freeze up so we can make home-made pizza next time the mood hits.

My husband said he much preferred my pizza to his. Next time, I’ll ask him to make it for dinner.


What is SCD?

What is this restrictive diet anyway? (estimated reading time 8 minutes)

I have lived with intestinal distress for as long as I can remember. I have a vivid memory of being in the hospital, in isolation, as a small child with very bad diarrhea; actually it’s a vivid olfactory memory. During my teen years, I didn’t like my Mom’s cooking so I drank large quantities of milk to fill up, and suffered badly from constipation; at the time, I thought breathing through the pushing would be good practice for giving birth (it wasn’t). As an adult, I swing between the two extremes, abbreviated in the SCD world as D and C, rarely settling into normal bathroom habits.

In 2005, my big sister was diagnosed with Celiac Disease. I started doing some reading and Voila! Here was my problem. Yay! Everything fit. So I went to the doctor. Blood tests came out negative. I was so sure, and my family history pointed in that direction, so the doctor performed a duodenal biopsy. Nada, zip. Nothing. Colonoscopy, same thing, though the doctor removed two small polyps. Small bowel barium follow-through. Again, nothing. Had a follow-up colonoscopy two years ago, perfectly healthy colon.

For me, medical tests usually come back “normal,” though I feel anything but. Two areas that don’t come out normal are my weight, I’m obese, and my blood sugars, which are borderline diabetic. Everything else – including thyroid, free T4, iron, kidney and liver function, electrolytes – normal. But my bathroom experiences and inability to lose weight are anything but.

Did you know that they call an illness a syndrome when they don’t know what’s really going on? You’ve probably guessed by now, my diagnosis: IBS, Irritable Bowel Syndrome.

So I thought I’d try the gluten-free diet anyway. It worked a bit, but I started feeling worse. Luckily, someone on one of the forums suggested I try the Specific Carbohydrate Diet (SCD). The science fit and I’ve come a long way.

However, it has been a rough seven years. I was extremely faithful for the first year and a half. Then I was faced with the seven-day bounty that was an Alaskan Cruise and my number was up. It’s been a see-saw battle and since then, I’ve never succeeded in being 100% SCD compliant for more than a full month, maybe six weeks. Which is why I feel like a fraud talking about a diet I can’t stick to.

However, I still believe that the science is sound and the diet is a healthy one, especially for people with severe intestinal damage who have Crohn’s disease or ulcerative colitis, and of course, for people with Celiac disease. For someone like me, where the consequences of non-compliance are less severe, the diet is hard to stick to. During that first year and a half, I lost a lot of weight (since re-gained), ditched my depression (never fully came back), and re-gained my energy (so-so lately, depends on what I eat, duh!).

Many other diets can be successful too if they limit or remove prepared or pre-packaged food. The Paleo diet and Weston A Price Foundation’s Traditional Diet are two examples. If you eat only foods you have prepared yourself, or only whole fruits, vegetables and fresh meat, eggs or cheese, you can’t help but be healthier.

So here’s a bit of a primer about the Specific Carbohydrate Diet, or SCD.

The official book for the SCD is Breaking the Vicious Cycle: Intestinal Health Through Diet by Elaine Gottschall. If you’re at all serious about this diet, you should buy the book.  It’s not well-written or well-organized, but all the information is there.

If you feel like clicking around to learn more about the SCD, here are a few links to get you started:

  • a summary of the diet from the official SCD website;
  • the Pecanbread website has information about using the SCD for children with autism; it discusses the strong brain gut connection;
  • an excerpt from the book Breaking the Vicious Cycle (BTVC) about Autism and SCD.
  • Chapter 1 from BTVC giving the history of Elaine Gottschall’s involvement with the SCD.

If you’re a reader, not a clicker, below is a brief summary of the theory and science behind the diet. Dr. Sidney Valentine Haas used the Specific Carbohydrate diet almost 100 years ago to treat Celiac disease. The diet is also used by people with severe digestive problems such as Crohn’s Disease and ulcerative colitis. It has recently proven helpful for children with autism, and the list of disorders that the SCD heals or helps continues to grow.

I believe very strongly in the the gut-brain connection. I feel that diets which heal digestion are also healing for psychological problems, though they are by no means the only answer.

In a Nutshell

The main thrust of the SCD is the elimination of all complex carbohydrates, including grains, sugars and starches, and allowing only simple, or specific carbohydrates. It is not a low carbohydrate diet.

The three most common simple carbs (monosaccharides) which are allowed are fructose, glucose and galactose. Anything other than a simple sugar needs enzymes to break down in your digestive tract and is therefore not allowed.

Anything with -ose at the end is a sugar, but if it’s not frutose, glucose or galactose, it’s not allowed on the SCD. Maltose, lactose and sucrose are examples of disaccharides, and are therefore right out. White table sugar and maple syrup contain sucrose=illegal. Honey has fructose and glucose=legal. Potatoes, corn and all grains are starch, and they too are just…don’t even think about it.

A diet mandating avoidance of complex carbs of course flies in the face of the currently accepted dietary standard that whole grains are healthier. Grains are in fact very difficult to digest and can make bad digestion worse. That is why I call my website Health Against the Grain. To maintain or improve my health, I am not only going grain-free, I am going against the grain of common wisdom, on many fronts.

More about the SCD: undigested carbohydrates make their way into the lower intestine, feeding the bad bacteria and yeast, creating excess acid and toxins, which cause dysbiosis and an imbalance in the gut flora. This leads to: a distended abdomen filled with intestines that are bloated, inflamed, gaseous, painful; diarrhea; constipation; cramping; autoimmune disorders; skin problems; lack of nutrient absorption; anemia; mental confusion and on and on.

The SCD works to slowly starve the bad bacteria and re-populate the intestines with good bacteria. The starving happens through the elimination of all complex carbs. All of them. That is where the difficulties come in. You can’t get away with just having a little bit of complex carbs. For the diet to be truly effective, to truly heal your intestines, you need to follow the diet fanatically. You may get some healing if you cheat, but the diet simply will not work if not followed 100%.

That is where some people fall off the wagon; guilty as charged. They are unable to maintain fanatical adherence to the diet. Or, many people are too daunted by the prospect of such a restrictive diet and never start it. But the gut doesn’t have a chance to heal if you keep eating foods that cause problems.

Re-population of good gut flora is done through the use of home-made yogurt which is high in probiotics. It has no lactose, unlike commercially-made yogurt which isn’t incubated long enough to digest all the lactose. Also, most commercial yogurts and probiotic supplements have bifidus bacteria, which though beneficial, can be opportunistic and take over the gut flora, crowding out the good bacteria. For this reason, bifidus bacteria are not allowed on the SCD.

Of course, if you are one of the lucky few with perfect digestion and optimum health, consider yourself fortunate. But if you ever find yourself sliding towards ill health, you might want to consider the SCD as a way back towards equilibrium and balance.

“Why don’t you just use a simple rule, eat mostly vegetables, mostly whole foods, and you’ll be fine.” That might be good for healthy people, but for people like us with compromised digestion, I feel very strongly that the SCD is the way to go. And as much as I struggle to stay on the diet, I keep trying. My food addictions keep getting in the way.

Support

The SCD is a diet that is difficult to manage alone, there is a lot to learn. There are some great online resources and support groups. Two excellent places to start are Yahoo groups: Pecanbread, with over 7,000 members, and SCDinfo with over 1500 members. You can join these groups and just lurk and learn, but if you post your struggles, you’ll move along much faster. Jordan and Steve have a wonderful website as well, and if you wade through the product ads, their content is solid. And of course, the official SCD website is the definitive source for all things SCD.

So, if you’re sitting on the fence about starting the SCD, do some research, think hard about whether you want optimal health, and when you’re ready, jump right in and make sure you get some support.

By the way, the picture on top of my home page is food that I served at my pre-teen daughter’s birthday party, and it’s all 100% SCD-legal. I’ll write about that in another post.

Getting Started with SCD

Buy the book Breaking the Vicious Cycle

Check out the official SCD Website

Read the instructions for starting the Intro Diet

Consult the SCD-legal/Illegal list of foods

Most important, get some support:


Please comment and share your thoughts and experiences, I want to hear from you. If you don’t see the comment box below, click on the bubble beside the title or under my name at the top of this article. Or follow Health Against the Grain on Facebook and comment there.


I can only speak for myself

When I started this blog my goal was to share what I’ve learned about the SCD and how the diet can heal digestive problems along with a host of related issues, including mental health. I still want to do this.

However, I find it impossible to remain 100 per cent compliant with the SCD. I have come a long way since starting the diet in 2005, but I still have such a long way to go. I subscribe to many SCD blogs, and am always inspired and humbled reading stories of others’ journeys. I don’t feel I am in a position to offer anything inspirational, which is partly why I haven’t published very much; I feel like a fraud espousing a diet I can’t even stick to. I’ve written drafts but can’t bring myself to publish them.

I am married, with three children, and much of what I do is by nature influenced by or influences, these four people. However, as much as I’d like to share about them, I respect their privacy. I read stories by mothers who talk about their children, and again, am grateful for this, but I struggle with the cost/benefit of affecting my kids’ and husband’s privacy.

The bottom line is that I can only really speak about my own experiences; I can only change or improve myself, and I still have such a long way to go. So the focus will be on my stories, my journey, my goals. But I will be tempted, oh how I will be tempted to talk about my kids and husband.

Amongst my friends and family, I am what’s called a high-discloser. I talk a lot about my personal life. I need to keep this in check in my writing. But I have a tendency too, to share my thoughts and opinions on controversial subjects such as mental health, pharmaceuticals, diet, vaccinations, amongst others. And that puts me at risk of ridicule and criticism. That’s OK, I’m open to dialogue. I want to share my research and experiences. I’m developing a thick skin.

The other shortcoming that keeps me from writing is that…I’m not a writer. So many successful blogs are written by people with writing credentials, “a former editor,” “a published writer,” “a poet,” “an English graduate.” I am none of these. My major in university was psychology, and my strengths in high school were math and science. But I’ll write anyway; to communicate, not to be artistic.

So I will continue with Health Against the Grain. I will write about so much more than physical and intestinal health. I will write about mental, dental, emotional, psychological, spiritual, financial, reproductive and other types of health. And I’ll share an eclectic mix of crafts, recipes, books, blogs, discoveries and interesting factoids.

I hope you will check in every once in a while. You can subscribe to email updates (upper right column on posts and home page) or follow me on Facebook. Please leave a comment, I welcome dialogue. I hope that each article I share will help at least one other person. If nothing else, it will help with my mental house cleaning by moving my thoughts from the squirrel cage of my brain onto the global page of the blogosphere.


Eat Dirt! Bentonite Clay

Adventures with a stomach bug (estimated reading time 2 ¾ minutes)

My daughter and I were very sick recently. I would not normally have been so persistent in requesting a stool sample test for a simple stomach flu, but the recent Canadian E. coli recall had me questioning whether we had ingested tainted beef. The lab results came back 48 hours later, negative for E. coli but positive for Campylobacter jejuni.

Of five family members, my pre-teen and I were the only two affected. We still haven’t confirmed how we were exposed, and we may never know. However we did share a steak that no one else ate, from a store with a long list of recalled items, including this steak. But we’re not sure if it was from a recalled batch.

I’d like to share with you a healing strategy which I’m sure helped us recover faster than we might have otherwise. Neither of us took antibiotics, or even ibuprofen or acetaminophen. Our doctor said he wouldn’t recommend antibiotics unless the symptoms lasted more than a week or there were complications.

We took small amounts of bentonite clay at the beginning, but in retrospect, should have taken more, or the same amount more often, until we felt better. I did take more on Friday, and by Saturday, was feeling much better. As my husband often argues however, it could have been the placebo effect, or maybe I was already getting better. Again, we’ll never know.

  • Camphylobacter jejuni, like many harmful pathogens, is a gram-negative bacterium.
  • Bentonite clay binds to gram-negative bacteria and helps eliminate them from your digestive tract; it is very helpful in relieving diarrhea.
  • You can make your own liquid bentonite clay supplement or
  • fill your own gelatin capsules with bentonite clay to carry around with you in case of emergencies.

I generally take the liquid clay when I’m at home, and I give my daughter the clay pills as it’s more palatable for her.

Liquid Bentonite Clay

Because of its positive electrical charge, it’s important to store liquid clay in a glass jar. I have a 500ml (2 cup) glass jar to which I add 6 tbsp of bentonite clay powder and top up with water until the jar is full. I put the lid on and shake. It needs to sit overnight for the clay to completely hydrate. I store it in the fridge and give it a good shake before pouring onto a spoon and swallowing, followed by a chaser of tap water.

Clay Pills

For the clay pills, I use a capsule filling kit called Cap.M.Quik with size “000” capsules.

Each “000” capsule holds 1/4 tsp of powder and is the largest size available. The kit makes 50 capsules at a time.

I use the tamper to get about 2/3 more powdered bentonite than I would without compressing it.

The clay pills can then be carried around in a pill bottle or Tic Tac box in my pocket in case I ever eat something I suspect might be harmful. I even take a couple if I find myself in a situation where I’m enjoying eating gluten when I shouldn’t be, or if I’m feeling queasy. I feel that it reduces the likelihood of my suffering an urgent bathroom experience. I have also used my kit to make capsules filled with cayenne pepper for digestion and turmeric for inflammation.

So yes, by all means “Eat dirt!” If you’re trying to achieve optimal health, turn to clay before resorting to antibiotics for intestinal bugs. It’s wonderful to use as a cleanse, it’s helpful to take if you’re ever feeling queasy, and if you ever catch yourself eating anything or anywhere that might be suspect, make sure you have a few clay pills in your pocket.


Knotted Daisy Bracelet

Knotted Daisy BraceletIf you are one of the 80% of people in North America living in an urban centre, it’s easy to get caught up in technology and lost in the concrete jungle, disconnected from the world. To maintain your santity, you need to find a way to connect with nature. You really do.

Sometimes all I can manage is a walk to the local park or beach to connect with the earth. I read that walking barefoot in the grass can help with insomnia, so I tried this with one of my kids recently, and it worked; we try to make a habit of it now.

There’s something about spreading my toes on the cool green grass or walking barefoot in the sand, that acts like a reset button for my soul. I feel grounded, refreshed, connected to the earth, strengthened to take on life’s many challenges. A couple of weeks ago, I walked my daughter home from school, and we made daisy chains.

At this time of year in Vancouver, the grass is filled with small daisies. I’ve been looking for instructions on how to knot them into bracelets and headbands and the only instructions I could find say to slit the stem with a knife or fingernail and insert the next flower through the hole in the stem. This doesn’t work for these diminutive lawn daisies. I’ve been fiddling with a solution and settled on this simple method. I do not claim to have invented it, I simply share it here for you to enjoy and pass along.

A white butterfly alights on lawn daisies at Kits Beach. Photo by A. Lavoie


Step 1: Pick 10-15 daisies with the longest stems possible, saving the longest stem for last.

Tighten knot
Step 2: Tie a knot in the stem, making the loop small enough that the flower head doesn’t pull through.


Step 3: Insert stem of second flower into the loop of the first knot.

Pull Down
Step 4: Pull the second stem through the loop until the head is at the knot.


Step 5: Pinch off the excess length from the first stem and make a new knot in the second stem.


Step 6: Keep tying daisies together until you’ve reached the desired length.You can probably be more careful than I was and try to make each stem the same length, for a more symmetrical bracelet.

Tie last stem to first flower
Step 7: Complete the loop by tying the stem from the last (longest) daisy around the stem of the first daisy!


And you’re done, you have a complete loop you can use for a bracelet, head band or necklace.

Closeup of a Daisy Chain daisy.


So go ahead, be a flower child, connect with the earth, sink your toes into the grass, weave flowers into your hair, and sleep sweetly tonight.

Easy Mint Iced Tea

Warm weather is upon us, and what better way to re-hydrate than with a delicious, home-made iced tea that takes minutes to prepare.

Most commercial drinks have too many ingredients that simply aren’t good for you. All you need for this recipe are peppermint-only tea bags, saccharin tablets and water.

Don’t worry, saccharin isn’t the cancer-causing bad guy we were led to believe. Turns out it’s only bad for you if you happen to be a rat; it does not cause cancer in humans. Saccharin was de-listed as a carcinogen by the FDA in 2000, and Canada is in the process of reinstating it as a sweetener in foods. It is the only artificial sweetener approved for the Specific Carbohydrate Diet (SCD). If you still don’t want to use sacharin, try honey instead, the other SCD-legal sweetener.

Here’s a recipe for mint iced tea. I make two litres (quarts) every day in the summer; it is refreshing and the kids love it. The mint is helpful if you have mild stomach upset. Add fresh-squeezed lemon juice for a boost of vitamin C, or substitute honey, for extra energy. A dash of salt helps replace lost electrolytes.

Easy Mint Iced-Tea
By: 
Recipe type: Drink
Prep time: 
Cook time: 
Total time: 
Serves: 4
 
A quick, refreshing, frugal alternative to store-bought drinks.
Ingredients
  • 1 litre (or quart) of good tap or filtered water
  • 1 mint tea bag (I use Celestial Seasonings)
  • 6 saccharin tablets (I use Hermesetas)
Instructions
  1. Add tea bag and saccharin tablets to a one litre (or quart) glass jar.
  2. Pour cold water into the jar.
  3. Wait a few minutes for the saccharin tablets to dissolve, then stir to distribute.
  4. It is ready to drink in about 10 minutes.
  5. Remove the tea bag after one day. Keeps for 2-3 days refrigerated
Notes
1. substitute 2 tbsp. honey for the saccharin; mix with hot water first to dissolve before adding to the glass jar, then top up the jar with tap water; 2. add the juice of half a lemon for extra zing and vitamin C (my favourite); 3. add ⅛ tsp of sea salt to replace your electrolytes

Hermesetas can be found in the diabetic section of most drug or grocery stores; sometimes you have to ask, and they will order it for you. Or you can order it online.

About Me

Imperfect Mom (estimated reading time 3 minutes)

My name is Theresa. I am a Mom, living in Vancouver, British Columbia, looking for ways to stretch a dollar and find paths to wellness. I do this mostly through diet, but also through natural remedies, meditation, yoga, physiotherapy, massage therapy, community involvement, friendships, gardening, cooking and crafts.  The list keeps growing as I learn more and more, and waste spend more and more of my precious time on Facebook and other sites (but let me reassure you, you won’t waste your time hanging around Health Against The Grain).

Climbing a cherry tree at Sunset Beach, Vancouver

Eating a whole foods diet is more frugal in the long run than eating the Standard American Diet and feeling chronically unwell. I’d like to see the Specific Carbohydrate Diet (SCD) become the Standard Canadian (or worldwide) Diet. My goal is to share my experiences along the road to wellness, focusing on the SCD, sharing other bits of wisdom, recipes and crafts, along the way.

The SCD was developed almost 100 years ago for the treatment of celiac disease and has been found invaluable in the treatment of inflammatory bowel disease (Crohn’s and colitis). People who  use this diet for these severe intestinal disorders suffer extreme consequences when they stray and are therefore highly motivated to remain compliant. Because I only have Irritable Bowel Syndrome (IBS), straying from the SCD has never resulted in serious enough consequences to keep me 100% compliant.

I went on the SCD in 2005, after my big sister was diagnosed with celiac disease, to help me deal with my Irritable Bowel Syndrome. IBS means I get bouts of “urgency” and in  public, I can find myself in trouble if I’m not close enough to a washroom. It has helped my IBS, but I’ve had a lot of problems remaining faithful to the diet.

When I first went on the SCD, I was able to stick to it about 95%. I did occasionally “cheat” with a sweet starchy treat like a donut or cookie, not good. I am very overweight, and when I first went on the SCD, I lost a lot of weight, and felt so much better. A running joke is that I’ve lost well over 100 pounds—I just keep losing the same ten pounds over, and over, and over again.

Another beneficial side-effect of being on the SCD is that my long-term, black-period-suffused depression has lifted for good. I have since had blue periods, but nothing like I did before going SCD, and for me, the cleaner my diet the better my state of mind.

Then in 2007, we went on a cruise and it was too much to resist. It started with some basmati rice, slid into croissants and before I knew it, the sweet pastries had raised their ugly heads and I was a goner. I’ve never been able to go back to fully 100% SCD compliant, though I try, oh I try.

My husband is not on the SCD, but he has high blood pressure and a family history of heart disease, so his goal is counting calories and reducing saturated fat. Kids being kids, they want the sweet treats and the gluten, “I’m just craving donuts Mom!” This makes for some very interesting food preparation challenges in our household.

I am an imperfect Mom, but I try my best. I work full time, and my husband cooks dinners and deals with the day-to-day childhood dramas. We both do the best we can, for ourselves and for our  three children, but there’s always room for improvement.

The focus of this blog is to share information about the influence of diet on health, with a special focus on mental health. I will also throw in a sprinkling of musings, observations and crafts that may only tangentially relate to diet, but all, in some way, relate to physical or mental health. All recipes posted will be SCD-legal. Sign up to be notified of new posts by email, or follow on Facebook. I hope you enjoy Health Against the Grain.

I read or reply to all comments (so far), or I can be reached by email: theresa at healthagainstthegrain dot com.