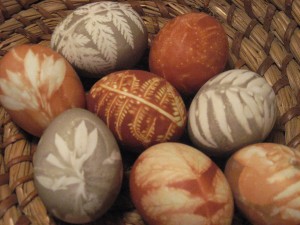
I love having beautifully decorated Easter eggs on the table at this time of year. Last year, I decided to make a batch with some natural ingredients and local greens. I made dyes with yellow onion skins and grated red beets (“recipe” below).
I much prefer using natural over synthetic dyes. Here is an interesting article from the Huffington Post about the history and digestion of food colouring and dyes. Even though we don’t always eat our Easter eggs, I just prefer going all natural; I can be a fanatical purist sometimes. And I was for this project, at least initially.
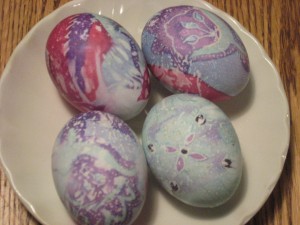
After making the naturally-dyed eggs, I felt a hankering for something more bright, more pink, more Eastery. I had heard about silk dyeing, and looked up Martha Stewart’s instructions. I’m a bit of a science geek, and I just found instructions from Scientific American in the form of a science experiment (cool). Don’t get me wrong, I know this isn’t natural, the dyes aren’t edible, and I would never eat these eggs, but sometimes…I just want something different. That’s me, I never colour inside the lines, square peg and all that.

I used a couple of threadbare silk shirts I had already cut up into rags (how decadent is that, I’ve got silk rags). I tore up some old cotton sheets, and I was set. I’ve written the silk-dyed instructions below.
The Deception of “Natural Dyes”
Back to the natural colours, there is no shortage of web pages or blog posts with lists and tables of colours and the natural ingredients you can use to achieve them. How wonderful.
Not really. Too many posts with instructions for natural dyes are disingenuously adorned with photos of deep pastel-coloured eggs. We try these recipes and think we’ve done something wrong when our eggs don’t turn out like the ones in the pictures. Or we dip the eggs for 20 minutes and are frustrated when the eggs aren’t dark enough. It takes patience, but it’s frustrating when people keep perpetuating untruths about natural dyes by re-posting recipes they haven’t tried.
You’ll notice for example that despite giving a list of ingredients to make five natural colours, including pink and blue, Martha Stewart only shows a half-dozen rust-coloured (sorry, sienna-coloured) eggs in this article. And the Huffington Post article I mentioned above uses a Flickr photo of artificially-coloured eggs. In reality, most natural dyes will yield variations on earth tones for dyed eggs.
I am on a quest to find a natural dye that produces a true deep red or pink colour. Suggestions I’ve found for red are: cranberries; canned cherries with juice; pomegranate juice; red raspberries; or lots of red onion skins. For pink: beets. I have yet to try these all, and though they might work for icing, they probably don’t work for eggs. Most are not cheap either. But if you’ve found something natural (and sorry, for me beetle shells don’t count) that works to dye an egg deep pink or true red, please share in the comments below and I’ll send good karma your way.
Quick and Dramatic Silk-Dye Method
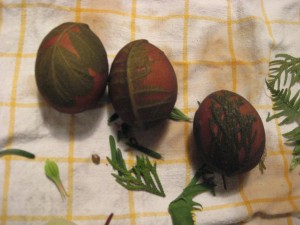
I didn’t invent this method, but collected the instructions from different articles. Cut a piece of vibrantly-coloured 100% silk into a piece big enough to wrap around your raw white egg, with a nice design centred on the front. You can use men’s ties, silk scarves, blouses. but it must be 100% silk (that’s the natural part), no polyester. Cover with a larger piece of lightweight, white cloth or cheesecloth and tie closed with a twist tie, elastic or piece of string. I used a torn up old bedsheet.
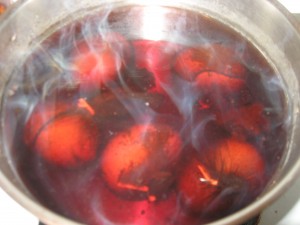
Place cloth-covered raw eggs into a small pot and pour in enough water to cover completely. Add 1/4 cup of white vinegar. Bring to a boil and simmer for 20 minutes. The vinegar reacts with the dyes in the silk to bind with the calcium carbonate in the egg shell.
Remove from pot and let cool for 5-10 minutes before removing the wrappings to discover the magic inside. Here’s what I got.
The vinegar weakens the bond of the calcium carbonate in the egg shell allowing the dye to penetrate it. This is why most dye recipes have vinegar. But vinegar is an acid that lowers the pH of a liquid. Anthocyanin is a chemical found in many of the foods used to make natural dyes. It changes colour depending on the pH of the liquid it is mixed with: acids turn anthocyanin red, alkalies turn it blue. I’d like to experiment with alkaline solutions to see if they would make brighter blues. Now you know why some hydrangeas are blue and others pink, the pH of the soil determines the colour of the flower. OK, enough science.
Natural-Dyed Eggs
Back to the natural dyes. To create a design on each egg, I went foraging for leaves and flowers around the neighbourhood; I live in the Pacific Northwest, so I can do this in March. But hey, I grew up on the prairies so I can feel the pain of the shortage of greenery at this time of year. You could go to a florist and ask for discarded greenery, or use bits of indoor plants. This photo shows some of my collection, with some cloth-wrapped eggs from the silk-dyed eggs described above.
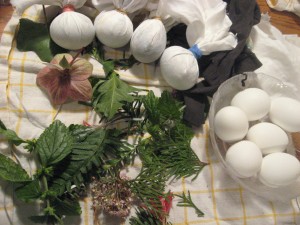
I draped a piece of greenery around each egg and wrapped it in a piece of nylon stocking (my teenage daughter goes through them like nobody’s business); I could have used cheesecloth. I secured each with a twist tie. This photo was taken after the eggs were dyed.
I placed the eggs into the hot dye water, allowed it to cool, and kept them there until they reached the desired colour.
You can let them sit anywhere from half an hour to 24 hours. Keep checking the colour to see if it’s good enough. I left these eggs in the onion-skin dye overnight. This is not a quick project. But it helps build patience and shows how something of value is worth the wait.
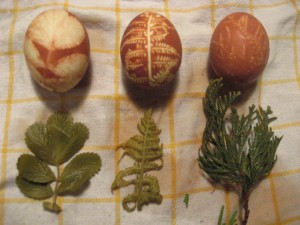
Remove the covering and greenery. Rinse with clear water and allow to dry. Don’t rub or some of the dye will come off. When they are completely dry, you can rub on a thin layer of oil to shine them up, be careful not to scrape the eggs when doing this. I used my bare hands to apply a tiny amount of oil, it felt very sensuous.
Beet Dye Fail
I don’t have before or during photos of the beet-dyed eggs, but trust me, the colour with these eggs ranged from light to dark gray, never even close to the pink I was hoping for, even though the dye bath itself was deep pink. There are three beet-dyed eggs in the collection pictures at the top and bottom of this post. I will continue on with my quest for pink, but I’ll save the beets for borscht.
- For rust colour: yellow onion skins from 2-4 medium onions
- For gray colour: grated beets (2-4 medium unpeeled beets)
- 4 cups water for each batch
- 1 tbsp white vinegar for each batch
- small pot
- strainer
- 6 hard-boiled eggs
- 6 pieces of greenery or flowers to place on eggs
- 6 pieces (or toes) of nylon stocking or cheesecloth to cover each egg
- 6 twist ties or pieces of string to tie them up
- Place onion skins or beets in a medium saucepan and add water.
- Cover pot. Bring to a boil and simmer for about 20 minutes.
- While dye is simmering, prepare each egg. Drape with a piece of greenery or flower, cover it with the nylon stocking or cheesecloth and tie with the twist tie or string.
- Strain the dye and return the liquid to the pot. Add 1 tbsp white vinegar.
- Add the wrapped hard-boiled eggs. Leave in as long as necessary to achieve desired depth of colour, from 20 minutes to 24hours.
- When desired colour is achieved, remove covering and greenery. Rinse with cold water and allow to dry.
- Eggs can be kept indefinitely if allowed to dry in a well-ventilated area, and turned every few months. If you wish to eat them, do so within a few days.
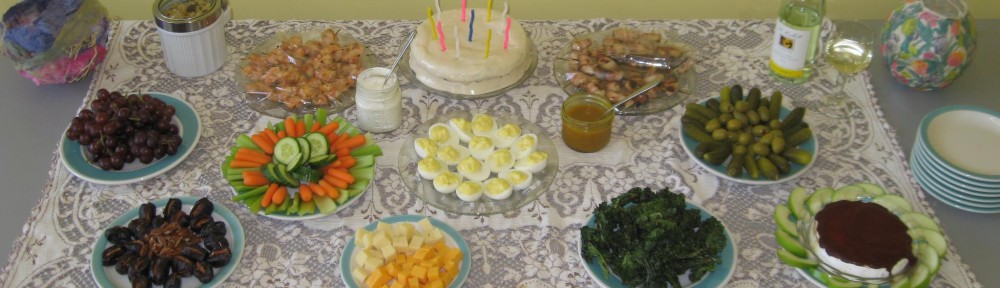
Here’s the final product, natural-dyed eggs mixed with the silk-dyed ones. Oh, and there’s one crayon-coloured egg my youngest did in school. I’m sure she had much more fun helping me with the home-made ones.
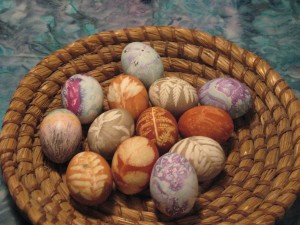
And, I have a little secret. I still have these eggs, one year later. The photo above was taken last year. This morning, I took a photo of the eggs I have left, here’s what they look like.
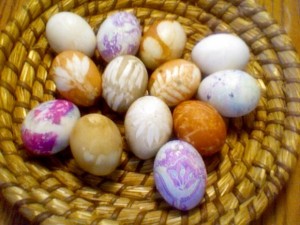
Some have faded more than others, but they are still Eastery enough for me. I knew I could leave them to dry in their shells. I have a Polish neighbour who does pysanka, and she said she just leaves the eggs to dry and keeps them from year to year, although I’m not sure if she uses raw or hard-boiled eggs. My eggs did smell after a few weeks, so I left them in the porch for a while, but now they are quite dry and odourless. What I’ve since read advises to leave them in cardboard egg cartons and to rotate them every few months to allow the gases to escape. The dye from the natural eggs comes off if I scrub or scrape them to clean them, even today, but the silk-dyed eggs’ colour is thoroughly embedded in the egg shell and doesn’t rub off.
That’s it. Let me know what you think, share your experiences, and have fun colouring your Easter eggs. Just don’t fool yourself into thinking it’s a quick project with instant, dramatic results…unless you’re doing the silk-dyed eggs.
All photos (c) 2013 healthagainstthegrain.com